These were made of coconut cake, filled with coconut pastry cream, and topped with a pillowy Italian meringue frosting.
Saturday, April 17, 2010
Coconut Cupcakes
These were made of coconut cake, filled with coconut pastry cream, and topped with a pillowy Italian meringue frosting.
Monday, April 12, 2010
A very personal wedding cake
My little brother, the baby of the family, got married this past weekend. (They grow up so fast!)
This half of PattyCake had one of the most nerve-wracking culinary experiences imaginable - I was charged with making and transporting his wedding cake from New York to Monterey, California. And when you spend hours baking and assembling a cake for the most important day of your little brother's life, it is VERY difficult to watch the tightly packed, icepack-stuffed box of buttercreamed cakes roll down the checked luggage conveyer belt into the bowels of JFK.
Luckily, everything turned out okay - the cakes survived, including the extra sheet cakes made for the indeterminate amount of wedding guests (turned out there were about 30), and despite some last-minute nervousness and quick scrambling, the cake was still pretty. And delicious. And perhaps most importantly, the bride was happy.
*Chocolate cake with vanilla custard and vanilla buttercream
*Vanilla cake with raspberry mousse and vanilla buttercream
This half of PattyCake had one of the most nerve-wracking culinary experiences imaginable - I was charged with making and transporting his wedding cake from New York to Monterey, California. And when you spend hours baking and assembling a cake for the most important day of your little brother's life, it is VERY difficult to watch the tightly packed, icepack-stuffed box of buttercreamed cakes roll down the checked luggage conveyer belt into the bowels of JFK.
Luckily, everything turned out okay - the cakes survived, including the extra sheet cakes made for the indeterminate amount of wedding guests (turned out there were about 30), and despite some last-minute nervousness and quick scrambling, the cake was still pretty. And delicious. And perhaps most importantly, the bride was happy.
*Chocolate cake with vanilla custard and vanilla buttercream
*Vanilla cake with raspberry mousse and vanilla buttercream
Labels:
cake,
california,
gold,
leaves,
wedding
Monday, April 5, 2010
Anniversary Cake, part II
Last year my lovely fiance's coworker, An Inspired Husband, requested my assistance in recreating their wedding cake for his wife as a surprise for their fifth anniversary. This year, similarly inspired, another coworker, let's call him Thoughtful Hubby, asked for us to do the same for his wife.
The cake below is a vanilla-vanilla cake, with raspberry buttercream filling, a la the original from Sweet Lisa's in Connecticut.

Their wedding cake was a massive tower of hexagonal and circular tiers, and despite being much smaller (it was meant for only two people after all), it was a little more challenging and time-consuming to cut and cover the hexagonal layer without the aid of a shaped pan. Nevertheless, it turned out well - Thoughtful Hubby told J. that his wife thought he'd gone back to the original bakery!
Wednesday, December 9, 2009
Developments
So much has happened over the last couple of months! In a nutshell: an internship, a new job, and an engagement! Meaning there hasn't been a lot of time for my lazy ass to really do a lot of baking at home.
Thanksgiving, however, was a different story. Since we couldn't go home, we decided to cook up a storm here in the city, making everything from a 14 lb bird (more than enough for our party of three) to homemade cranberry sauce, and of course, pumpkin pie.

I wanted something a little different than the traditional pumpkin pie though, and tried adding some cheesecake - hence the white and orange swirls above. While the effect was pretty, the pumpkin flavor was really so strong that if I'd eaten it with my eyes closed, I wouldn't have missed the cheesecake.
Anyway, some bourbon caramel, candied deep-fried pecans, and good old vanilla ice cream rounded out the dessert plate. Yum! (Forgive the iPhone photo, my camera decided to be stupid and stop working.)

Happy holidays!!
Labels:
cheesecake,
pie,
pumpkin,
Thanksgiving
Tuesday, October 13, 2009
the last vestiges of a long gone summer
5 Tbsp vanilla sugar
1 vanilla bean, split and scraped
1/2 bottle sweet white wine
Combine all ingredients, chill for at least two hours, preferably overnight and serve - preferably in a pretty glass - with plenty of crème chantilly (whipped cream sweetened with powdered sugar and vanilla).
Cin Cin!
Tuesday, September 8, 2009
Summertime Pie
As the weather gets cooler and berry season is coming to an end, it's time to make the most of the few weeks we have left of summertime flavors.
Last month after graduating and leaving my former job in pursuit of more culinary adventures, I spent a week in D.C. visiting my family. My Dad has a very particular sweet tooth - he's not crazy about cakes, cookies, or chocolate, but he does love pie. He will take a pie warm or cold, big or small, and with any type of fruit. It's amazing for me to watch my normally stoic middle-aged father turn giddy as a little boy at the site of baked fruit encased in crust.
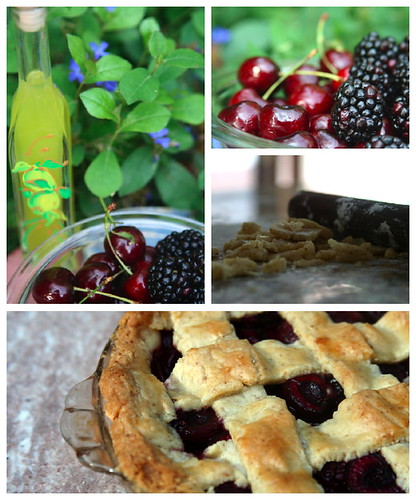
Knowing this, I did a lot of pie baking while at their house, and was particularly inspired by a bottle of limoncello my parents had received as a gift from a friend who'd recently returned from a trip to Italy.

Not that I wanted to bake a lemon pie, but rather thought that the limoncello would be a great compliment to the sweet and rich cherries my Mom had picked up from the farmer's market. Toss in a couple of blackberries for small bursts of intense flavor, and you have a great pie filled with the tastes of summer.
I used a linzer dough recipe from Food Network Canada (replacing almonds for the hazelnuts), and about a pound of cherries with a pint of blackberries. Just bloom and melt about a teapoon of gelatin in about 3 tablespoons of limoncello, toss with pitted cherries and blackberries and a 1/4 cup of sugar, and bake for about an hour. (I prefer to taste more fruit than sugar in my pies, but if you prefer something sweeter add more sugar.)

The crust is flaky and buttery to offset the sweet, tart cherries, and the hit of limoncello brings out the deeper berry notes. It's not simple, but it is definitely worth making before we have to say adios to warm weather food for the winter.
Last month after graduating and leaving my former job in pursuit of more culinary adventures, I spent a week in D.C. visiting my family. My Dad has a very particular sweet tooth - he's not crazy about cakes, cookies, or chocolate, but he does love pie. He will take a pie warm or cold, big or small, and with any type of fruit. It's amazing for me to watch my normally stoic middle-aged father turn giddy as a little boy at the site of baked fruit encased in crust.
Knowing this, I did a lot of pie baking while at their house, and was particularly inspired by a bottle of limoncello my parents had received as a gift from a friend who'd recently returned from a trip to Italy.
Not that I wanted to bake a lemon pie, but rather thought that the limoncello would be a great compliment to the sweet and rich cherries my Mom had picked up from the farmer's market. Toss in a couple of blackberries for small bursts of intense flavor, and you have a great pie filled with the tastes of summer.
I used a linzer dough recipe from Food Network Canada (replacing almonds for the hazelnuts), and about a pound of cherries with a pint of blackberries. Just bloom and melt about a teapoon of gelatin in about 3 tablespoons of limoncello, toss with pitted cherries and blackberries and a 1/4 cup of sugar, and bake for about an hour. (I prefer to taste more fruit than sugar in my pies, but if you prefer something sweeter add more sugar.)
The crust is flaky and buttery to offset the sweet, tart cherries, and the hit of limoncello brings out the deeper berry notes. It's not simple, but it is definitely worth making before we have to say adios to warm weather food for the winter.
Friday, September 4, 2009
a very belated wedding cake post
Friday, August 21, 2009
Graduation
Hey, so I totally forgot to post graduation photos in the last post. And really, what would be the point of spending all that money, nine months of our lives, and the last month in a kitchen without working air conditioning for 15 hours a week if we can't at least celebrate at the end?

Apparently we were the first class to ever hand out class superlatives. Rebekah and I were excited to share them with everyone after everyone received their diplomas. Although we look mischievous above, they really were quite tame and graduation-worthy.


Apparently we were the first class to ever hand out class superlatives. Rebekah and I were excited to share them with everyone after everyone received their diplomas. Although we look mischievous above, they really were quite tame and graduation-worthy.

After the ceremony, we relaxed with some well-deserved champagne.

(Yay, we're graduated!!)
Tuesday, August 18, 2009
A couple of things
So, as a quick catch-up, I just wanted to share some wedding cake and graduation photos. Enjoy! I'll be back with a great Linzer dough recipe that got me rave reviews when used in summertime pies.
This wedding cake, like Rebekah's earlier, was a class project done in a Marie Antoinette theme. These pictures were taken about a week after the cake had been sitting in my fridge (again, I'm going to play the 'busy life' card) so the curved bottom and top tiers look a little ... well, dumpy, here.
But you can see that the use of the gold edible paint in the beading, royal icing piping, and the furls at the top really give this cake a fun and flamboyant twist. The theme was also expounded in the chocolate cameos on each of side of the middle tier.
Thursday, August 13, 2009
PattyCake makes its way into the mainstream!
http://www.saveur.com/article/Recipes/Meyer-Lemon-Egg-Salad
Saturday, June 13, 2009
It's graduation time!
June is known for many things: the official start of summer (yea!), Father's Day and a flurry of graduation celebrations. My cousin Zach was one of the many celebrating his big leap from high school to college and, while I refuse to believe that my little cousin known for his suffocating bear hugs is no longer so little, PattyCake jumped at the chance to help him celebrate his big day.
Two early morning plane rides to Wisconsin, 17 hours and 150 assorted cupcakes and cookies later, Zach had his {cup}cake and I was ready for a much deserved nap (didn't you read Jade's former post? Birthdays, weddings and graduations...oh my!).
The assortment:
Cupcakes: vanilla, chocolate and red velvet.
Frostings: vanilla, chocolate, praline and cream cheese.
Cookies: vanilla-sugar, homemade oreos and bourbon pecan.
Labels:
chocolate,
cookies,
cupcake,
graduation,
praline
Monday, June 8, 2009
Busy Little Bees!
So it's been a while since Rebekah or I have posted anything, and we promise it's not because we have forgotten to! We have been extremely busy over the past month and now that we have a little time to rest, it's the perfect time to catch you up.
We have been delivering cupcakes across this great city, and also even all the way out to Wisconsin! (More on that later.) We also had our first cake order, which was probably one of the most challenging and rewarding jobs yet.
We had to recreate a wedding cake.
No small feat, let me tell you. The original cake, served five years ago at the wedding of J.'s boss M., was completely custom-made, from the bright-red fondant with elegant flowered piping, to the filling layered with dark chocolate ganache, vanilla cake, and raspberry mousse. To top it off a handmade, pure white, sugar-paste rose bouquet flourished atop the five tiers. It was a masterpiece of a cake and our task was to recreate it (in miniature!) to serve at their anniversary lunch.
We could have done a lot of this with store-bought parts. However, being the ambitious girls we are, everything was made from scratch. Once the easy parts were out of the way - the cake, raspberry mousse, and ganache – we tackled the hardest part: draping the fondant on the tiers and applying the piping. Finally, the sugar-paste flowers were molded by hand, shaping little white buds and wrapping them with thin petals with our freshly made sugar-paste.
We've heard horror stories of fondant cracking, peeling, and falling apart, but one thing we think more bakers should talk about is sweating. Not the sweating that you do when you realize you have to make fondant from scratch at 11:30 PM because the white store-bought fondant doesn't want to absorb enough red food coloring to get it even close to the color your client wants, but rather the sweating the cake does as it defrosts beneath your, previously perfect, layer of fondant, creating a problematic layer of moisture. This discovering found Jade doing her own form of sweating (and I’m sure grumbling) into the wee-hours of the morning while holding a hand dryer to the otherwise lovely cake.
Despite the unfortunate discovery of “sweating,” the cake was delivered in perfect form to the restaurant and promptly enjoyed (and admired) by the clients. Whew! Next, remind us to tell you about the red velvet mishap!
Thursday, May 7, 2009
Bon Bons
How to begin a post on chocolate? Chocolate means something different to everyone - whether it's an addiction that begins with a bar of Toblerone and ends with an empty wrapper, or a begrudgingly strict avoidance of anything to do with cocoa beans and sugar.
Personally, I try to employ Michael Pollan's sensible directive to, "Eat food. Not too much. Mostly plants." but it seems to get thrown out of the window when chocolate is around. And lately it seems to be around more often than not because of the recent focus on chocolate in our course at FCI.
We have spent the last couple of classes making chocolate candies, more specifically bon bons. These are products of our collective effort making an assortment of flavors, including espresso, toasted coconut, bourbon pecan, spice, and champagne fillings. Believe me when I say that they're worth putting a temporary hiatus on even the strictest of diets.
While I'm not surprised that these chocolates have turned out to be delicious, I am surprised by how much I've enjoyed creating these little bon bons. I now find myself daydreaming about all of the upcoming special occasions we can make chocolates for, and which ones of our friends would appreciate them the most. Who knows, maybe if you're lucky I'll make some for you!
Monday, May 4, 2009
Cheddar Dill Scones
It's been raining, in case you haven't noticed. It's the kind of drawn-out, drizzly rain that lasts for days and makes me want to curl up in a Snuggie on the couch (not that I have one ... hint hint). In weather like this, the waft of cheesy scones baking in the oven gives me with a warm comfort and tides me over until the sun comes out of hiding.
Yesterday was the perfect day to go into a baking frenzy, seeing as I was confined to being indoors anyway. I took the opportunity of being home-bound to bake up a care package for my brother A. in California. My afternoon of baking began with these scones, a slight variation of Ina Garten's recipe - but with some whole wheat flour for a healthy kick. And since I like my scones fluffy, I double the cream for a biscuit-like crumb (if you prefer a drier, more dense texture this recipe is not for you).
Cheddar Dill Scones (adapted from the Barefoot Contessa)
3 cups whole wheat flour
1 cup all purpose flour
2 T baking powder
3 tsp salt
3/4 lb cold butter, diced
2 cups cold heavy cream
4 eggs
1/2 lb grated cheddar cheese
1 cup fresh dill, minced
heavy cream, for brushing
Preheat oven to 400 degrees.
Combine dry ingredients, less 1 T (reserve for coating cheese and dill), and add butter. Mix until the butter is in pea-sized pieces.
Beat eggs and heavy cream together, add to dry ingredients. Mix just to combine.
Toss 1 T flour with cheese and dill, then knead into batter. Form four large rounds from the batter, and cut each round into 6 wedges. Place on parchment-lined sheet pans, bake for 25 minutes.
Cool on racks and enjoy!
Wednesday, April 29, 2009
Strawberries and Springtime (Almost!)
When the weather hits the 80s, I don't think of beaches or suntanning, but instead ... the farmer's market! This past weekend's balmy weather flipped the switch in my mind from root vegetables and canned tomatoes to rhubarb and strawberries. I've been promising my friend Jason a rhubarb pie for the past two years, and have come up miserably short (okay, maybe the better word is lazy).
Sunday morning, I eagerly made my way to the Thompkin's Square Park farmer's market hoping to find the first sign of spring in the produce baskets. Stall after stall, however, I was reminded that although the weather is cooperating, it's still a little early for fresh spring fruit. I decided to satiate my craving with frozen strawberries instead, as a test run for Jason's eventual rhubarb and strawberry pie.
When the time comes, I'll try it again and update this recipe with fresh fruit - it should be any day now ...

Strawberry Pie
2 packages frozen strawberries, 1 pound each
200 g sugar
juice from 1/2 a lemon
1 T vanilla extract
100 g heavy cream
1 packet granulated gelatin
pate brisee pie crust (or store-bought, if you can't bear to turn on your oven in the heat)
Blind bake pie crust in a 350 degree oven until golden brown - you won't be baking the pie filling, so make sure it's fully done. Set aside to cool completely before using.
Add strawberries, sugar, and lemon juice to a large sauce pot over medium-low heat. Stir the strawberries to coat them with sugar, and then let the strawberries cook until they're just starting to fall apart (about 30 minutes).
Strain the strawberries and reserve the juice and pot you cooked them in. Add the vanilla extract to the strawberries, and set aside to cool.
Save about 1/2 cup of the strawberry juice in a bowl, and return the rest to the same pot. Keep warm over low heat to reduce.
When the reserved 1/2 cup of strawberry juice is cool, add the gelatin to bloom. Once bloomed, add the hot strawberry juice from the pot to melt the gelatin, and stir until well combined.
Whip the heavy cream to a soft peak, sacrifice a little to the strawberry juice/gelatin mix to lighten it, and then fold the strawberry juice into the whipped cream. Fold the whipped cream mixture into the cooled strawberries, and pour into the cooled pie shell. Refrigerate at least one hour, or until it sets.
*I had some extra filling, which I just poured into individual ramekins. It's delicious topped with crushed vanilla snaps.
Sunday morning, I eagerly made my way to the Thompkin's Square Park farmer's market hoping to find the first sign of spring in the produce baskets. Stall after stall, however, I was reminded that although the weather is cooperating, it's still a little early for fresh spring fruit. I decided to satiate my craving with frozen strawberries instead, as a test run for Jason's eventual rhubarb and strawberry pie.
When the time comes, I'll try it again and update this recipe with fresh fruit - it should be any day now ...
Strawberry Pie
2 packages frozen strawberries, 1 pound each
200 g sugar
juice from 1/2 a lemon
1 T vanilla extract
100 g heavy cream
1 packet granulated gelatin
pate brisee pie crust (or store-bought, if you can't bear to turn on your oven in the heat)
Blind bake pie crust in a 350 degree oven until golden brown - you won't be baking the pie filling, so make sure it's fully done. Set aside to cool completely before using.
Add strawberries, sugar, and lemon juice to a large sauce pot over medium-low heat. Stir the strawberries to coat them with sugar, and then let the strawberries cook until they're just starting to fall apart (about 30 minutes).
Strain the strawberries and reserve the juice and pot you cooked them in. Add the vanilla extract to the strawberries, and set aside to cool.
Save about 1/2 cup of the strawberry juice in a bowl, and return the rest to the same pot. Keep warm over low heat to reduce.
When the reserved 1/2 cup of strawberry juice is cool, add the gelatin to bloom. Once bloomed, add the hot strawberry juice from the pot to melt the gelatin, and stir until well combined.
Whip the heavy cream to a soft peak, sacrifice a little to the strawberry juice/gelatin mix to lighten it, and then fold the strawberry juice into the whipped cream. Fold the whipped cream mixture into the cooled strawberries, and pour into the cooled pie shell. Refrigerate at least one hour, or until it sets.
*I had some extra filling, which I just poured into individual ramekins. It's delicious topped with crushed vanilla snaps.
Monday, April 27, 2009
Daring Baker's Challenge and Kaffir Lime Cheesecake
The April 2009 challenge is hosted by Jenny from JennyBakes. She has chosen Abbey's Infamous Cheesecake as the challenge.
This April was PattyCake's first participation in the Daring Baker's Challenge. Happily, the first recipe was cheesecake, something that we have a severe, almost debilitating love of. Our version, infused with the bright, intoxicating fragrance of Kaffir lime leaves is the perfect end to a sun-filled day. Refreshing, light and perfectly creamy.
Kaffir Lime Cheesecake with Macadamia-Graham Cracker Crust
[adapted from Abbey's Infamous Cheesecake]

For crust:
1 1/3 cup graham cracker crumbs
½ cup macademia nuts; finely chopped
2/3 stick butter; melted
1 ½ tbsp granuated sugar
1 tsp vanilla extract
For cheesecake:
2 sticks of cream cheese, 8 oz each at room temperature
2/3 cup sugar
1 large egg
1 1/3 cup heavy cream
12 Kaffir lime leaves
1 tbsp lime juice
1 tbsp vanilla extract
pinch of salt
DIRECTIONS:
1. Preheat oven to 350 degrees F.
2. Combine heavy cream and kaffir lime leaves and bring just to a boil. Reduce heat and simmer until liquid has reduced by half. Discard Kaffir leaves and set aside and allow the infused cream to cool slightly.
2. Mix together the crust ingredients and press into an 8-9 inch spring form pan. Set aside.
3. Combine cream cheese and sugar in the bowl of a stand-mixer and cream together until smooth. Add eggs, one at a time, fully incorporating each before adding the next. Make sure to scrape down the bowl in between each egg. Add reduced Kaffir lime infused heavy cream, vanilla and lime juice and blend until smooth and creamy.
4. Pour batter into prepared crust and tap the pan on the counter a few times to bring all air bubbles to the surface. Place pan into a larger pan and pour boiling water into the larger pan until halfway up the side of the cheesecake pan. If cheesecake pan is not airtight, cover bottom securely with foil before adding water.
5. Bake 45 to 55 minutes, until it is almost done - this can be hard to judge, but you're looking for the cake to hold together, but still have a lot of jiggle to it in the center. You don't want it to be completely firm at this stage. Close the oven door, turn the heat off, and let rest in the cooling oven for one hour. This lets the cake finish cooking and cool down gently enough so that it won't crack on the top. After one hour, remove cheesecake from oven and lift carefully out of water bath. Let it finish cooling on the counter, and then cover and put in the fridge to chill. Once fully chilled, it is ready to serve.

Prep notes: While the actual making of this cheesecake is a minimal time commitment, it does need to bake for almost an hour, cool in the oven for an hour, and chill overnight before it is served. Plan accordingly!
Kaffir Lime Cheesecake with Macadamia-Graham Cracker Crust
[adapted from Abbey's Infamous Cheesecake]
For crust:
1 1/3 cup graham cracker crumbs
½ cup macademia nuts; finely chopped
2/3 stick butter; melted
1 ½ tbsp granuated sugar
1 tsp vanilla extract
For cheesecake:
2 sticks of cream cheese, 8 oz each at room temperature
2/3 cup sugar
1 large egg
1 1/3 cup heavy cream
12 Kaffir lime leaves
1 tbsp lime juice
1 tbsp vanilla extract
pinch of salt
DIRECTIONS:
1. Preheat oven to 350 degrees F.
2. Combine heavy cream and kaffir lime leaves and bring just to a boil. Reduce heat and simmer until liquid has reduced by half. Discard Kaffir leaves and set aside and allow the infused cream to cool slightly.
2. Mix together the crust ingredients and press into an 8-9 inch spring form pan. Set aside.
3. Combine cream cheese and sugar in the bowl of a stand-mixer and cream together until smooth. Add eggs, one at a time, fully incorporating each before adding the next. Make sure to scrape down the bowl in between each egg. Add reduced Kaffir lime infused heavy cream, vanilla and lime juice and blend until smooth and creamy.
4. Pour batter into prepared crust and tap the pan on the counter a few times to bring all air bubbles to the surface. Place pan into a larger pan and pour boiling water into the larger pan until halfway up the side of the cheesecake pan. If cheesecake pan is not airtight, cover bottom securely with foil before adding water.
5. Bake 45 to 55 minutes, until it is almost done - this can be hard to judge, but you're looking for the cake to hold together, but still have a lot of jiggle to it in the center. You don't want it to be completely firm at this stage. Close the oven door, turn the heat off, and let rest in the cooling oven for one hour. This lets the cake finish cooking and cool down gently enough so that it won't crack on the top. After one hour, remove cheesecake from oven and lift carefully out of water bath. Let it finish cooling on the counter, and then cover and put in the fridge to chill. Once fully chilled, it is ready to serve.
Prep notes: While the actual making of this cheesecake is a minimal time commitment, it does need to bake for almost an hour, cool in the oven for an hour, and chill overnight before it is served. Plan accordingly!
Labels:
cheesecake,
graham cracker,
Kaffir lime,
macademia nut
Wednesday, April 15, 2009
Cashew Blondies with Vanilla Caramel
Caramel-cashew is one of those matches made in (food) heaven. Akin to apple-cinnamon or oatmeal-raisin, the combination of silky, sweet caramel and crunchy, salty cashews is better than the sum of its parts.
My first taste of this delectable combination was in a Culver’s. For those who grew up outside the Midwest, Culver’s is an “upscale” fast food chain known for its butterburgers, cheese curds and frozen custard. Cliché? Perhaps. Fabulous? But of course.
Mike, my step-dad and by far one of my favorite people in the world, has defaulted to this decadent combination since the day I met him. The first time we frequented Culver’s, (and, I’ll admit, every time since) I reached around my default dessert, an oversized concrete chocolate malt, and pilfered a large, creamy spoonful of his sundae.
Warm caramel flowed through the cold, creamy custard, picking up the salt crystals from the cashews and making the flavor utterly addictive. That combination has stuck with me for years and will always bring about fond memories of balmy, custard-filled summer evenings with Mike.
So here it is: a caramel-cashew sundae in bar form, heightened with aromatic vanilla and a hefty hint of salt. Miguel, these sweet, salty temptresses are all for you…the package should arrive in three to five business days.
Cashew Blondies with Vanilla Caramel
For Blondies
• 8 Tbsp butter; melted
• 1 cup brown sugar
• 1 large egg; room temperature
• 2 tsp vanilla
• ½ tsp kosher salt
• 1 cup all-purpose flour
• ½ tsp baking powder
• ¾ cup salted cashews; coarsely chopped
For Caramel
• ¾ cup vanilla sugar
• Water; just enough to make a paste with sugar
• ¼ cup heavy whipping cream
• 1 tbsp butter; melted
• ¼ tsp vanilla
• Pinch of salt
Line an 8x8-inch baking dish with parchment paper allowing it to come up the sides of the pan. Butter liberally. Preheat the oven to 350˚F.
Whip together butter and sugar till lightened in color. Whisk together the egg and vanilla and add gradually to sugar-butter mixture. Make sure the liquid is fully incorporated into the batter before moving on. Sift together flour, baking powder and salt and add all at once, mixing just to combine. Stir in chopped cashews and pour mixture into prepared pan.
Make a caramel by combining vanilla sugar with water just until the sugar is hydrated and the mixture is a paste in a thick-bottomed pan. Use a wet pastry brush to wipe down the sides of the pan and avoid forming sugar crystals. Place the pan over medium-high heat and bring mixture to a boil. Regularly brush down the sides with the pastry brush and do NOT stir. As the mixture begins to color gently swirl the pan to distribute the heat evenly. Allow the caramel to cook to a medium color and remove from heat. Carefully stir in heavy cream (the mixture will bubble up). Stir in melted butter, vanilla and salt. Allow the caramel to cool slightly.
Pour caramel over top of blondie and use a sharp knife to swirl it into the batter.
Bake at 350˚F 50 – 60 minutes or until a toothpick inserted in the center comes out clean. Cover with aluminum foil halfway through baking to avoid browning the top too much.
*If you don’t have vanilla sugar handy, simply use regular granulated sugar and add a bit more vanilla extract.
*To make your own vanilla sugar simply combine granulated sugar with leftover dried vanilla beans. Continue adding sugar and vanilla to keep a ready supply of this fragrant, versatile sugar.
Thursday, April 2, 2009
Monday, March 23, 2009
crepes - two ways
This past weekend I indulged in much needed Sunday morning in front of the stove. With music playing in the background, steaming coffee in hand and my roommate reading the Times on the couch (okay futon), I set about making crepes. Since I’m very much into the “variety is the spice of life” philosophy when it comes to food, I cooked up two versions: original and buckwheat.
For fillings I simply went to the pantry. Since Meyer lemons have been a constant in the apartment for the past few weeks, they were cut in half for easy access to their fragrant juice. Dusted with powdered sugar, those sweet, lemony crepes are always a favorite. I also brought out the jar of Nutella that seems to take up residence wherever I am in the world. (I have very fond memories of eating Nutella straight from the jar in my apartment in Rome, using thin breadsticks as merely transportation for the gobs of the creamy, chocolaty goodness that is Nutella.) Smeared with the chocolate-hazelnut spread and sprinkled with a dusting of toasted slivered almonds those crepes were reason enough to get up in the morning. I also set out maple syrup, butter sweetened with sugar and vanilla, nutmeg, cinnamon-sugar and a variety of toasted nuts to round out the spread.
The best part of the day – other than the fact I got to cook barefoot in a sunny kitchen and eat crepes all afternoon – was that I froze the rest of the crepes for a quick, decadent breakfast/lunch/dinner in the (very) near future.
Since I have qualms about publishing someone else’s fabulous recipes on the site, you can find the recipes I used here and here.
Crepe Tips:
1. Don’t fear the crepe. In my experience, they’re easier than pancakes could ever hope to be.
2. The first of any batch is always a dud, no worries. Either toss it in the trash, feed it to the dog…or do what I did and eat it anyway.
3. Use a heavy, nonstick skillet as well as non-stick spray and butter. It may be a bit overcautious, but they slide out paper thin and flawless every time.
4. Use your fingers to flip rather than a spatula. Total control. (Plus you have the added pleasure of pseudo playing with your food).
5. To freeze, allow crepes to cool completely. Stack in layers with parchment or wax paper between each crepe, place in ziplock bag et voila! Crepes anytime!
6. Make crepes savory by filling with mushrooms, shallots, brie, turkey, parmesan, asparagus…the options are endless!
For fillings I simply went to the pantry. Since Meyer lemons have been a constant in the apartment for the past few weeks, they were cut in half for easy access to their fragrant juice. Dusted with powdered sugar, those sweet, lemony crepes are always a favorite. I also brought out the jar of Nutella that seems to take up residence wherever I am in the world. (I have very fond memories of eating Nutella straight from the jar in my apartment in Rome, using thin breadsticks as merely transportation for the gobs of the creamy, chocolaty goodness that is Nutella.) Smeared with the chocolate-hazelnut spread and sprinkled with a dusting of toasted slivered almonds those crepes were reason enough to get up in the morning. I also set out maple syrup, butter sweetened with sugar and vanilla, nutmeg, cinnamon-sugar and a variety of toasted nuts to round out the spread.
The best part of the day – other than the fact I got to cook barefoot in a sunny kitchen and eat crepes all afternoon – was that I froze the rest of the crepes for a quick, decadent breakfast/lunch/dinner in the (very) near future.
Since I have qualms about publishing someone else’s fabulous recipes on the site, you can find the recipes I used here and here.
Crepe Tips:
1. Don’t fear the crepe. In my experience, they’re easier than pancakes could ever hope to be.
2. The first of any batch is always a dud, no worries. Either toss it in the trash, feed it to the dog…or do what I did and eat it anyway.
3. Use a heavy, nonstick skillet as well as non-stick spray and butter. It may be a bit overcautious, but they slide out paper thin and flawless every time.
4. Use your fingers to flip rather than a spatula. Total control. (Plus you have the added pleasure of pseudo playing with your food).
5. To freeze, allow crepes to cool completely. Stack in layers with parchment or wax paper between each crepe, place in ziplock bag et voila! Crepes anytime!
6. Make crepes savory by filling with mushrooms, shallots, brie, turkey, parmesan, asparagus…the options are endless!
Subscribe to:
Posts (Atom)